Hello
Authentication
The oidc-authn example will be using https://gitlab.com/perobertson-tools/oidc-authn/. When navigating to that chapter you will be redirected to a login page before you can view the content.
oidc-authn
If you can see this, then you must have logged in successfully.
You can verify that by looking at the response headers for a cookie with the name oidc-authn-session.
Guides
These are various guides that I have created. They are in no specific order.
Convert MBR partition table to GPT
This guide covers how to convert a MBR disk partition table to to GPT.
When do you need this
- You need to boot from EFI
- You need more than 4 primary partitions
- You have a disk larger than 2TB
Overview
- use
gdiskto add a new partition to convert to GPT - use
gdiskto delete the new partition - use
growpartto to extend the partition to the full space - grow the filesystem to fill the partition
Assumptions
- The partition table to be converted is on the disk
/dev/nvme0n1 - The disk has 3 partitions; generally the case for arm64.raw images
/boot/efi/boot/
Steps
- Inspect the initial block setup
lsblk - Inspect the initial disk setup
sudo gdisk -l /dev/nvme0n1 - Convert MBR to GPT by adding a new partition
Interactive command:sudo gdisk /dev/nvme0n1- Use
nfor adding a new partition - Use the defaults provided to add a new partition at the end
- Use
wto write the changes to disk
- Use
- Inspect the partition table again
sudo gdisk -l /dev/nvme0n1 - Delete the newly created partition
Interactive command:sudo gdisk /dev/nvme0n1- Use
dfor deleting a partition - Use the new partion number; see the output from the previous list command
- Use
wto write the changes to disk
- Use
- Tell the kernel to rescan the partition table to pick up the changes
sudo partprobe
Optional steps
These steps are needed if you want to expand the last partition to fill the disk
- Install
growpartsudo apt-get update sudo apt-get install cloud-guest-utilssudo dnf install cloud-utils-growpart - Grow the partition to fill the space
sudo growpart /dev/nvme0n1 3 - TODO: grow the filesystem
- This may be done automatically by
growpart
- This may be done automatically by
References
OrangePi5Max
Initial state:
- able to boot from SD card
- able to boot from USB2.0
- only some official Linux distros work (~Ubuntu 22.04)1
- unable to boot from NVMe
- unable to boot from USB3.0
Initial hardware support when booted from the official Ubuntu image:
- HDMI furthest away from USB-C power
- 2xUSB2.0
- 2xUSB3.0
- Bluetooth
- Ethernet
- HDMI next to USB-C power
- WiFi
Boot order
By default it can only boot from the SD card slot.
You need to flash the SPI with a new u-boot image to be able to boot from USB
or the NVMe slot. After flashing the order is:
- SD Card
- NVMe
- USB
Debugging over serial
- power off the orangepi
- plug in the wires on the USB to TTL into the orangepi.
See
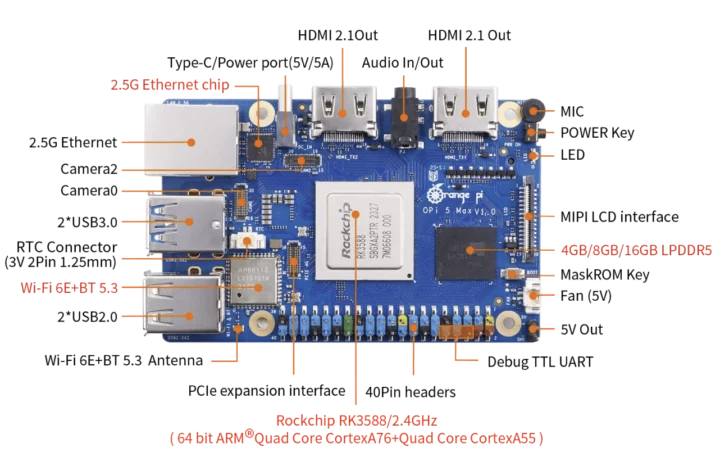
Debug TTL UARTin the top view image down below in the specs. - in a terminal run
ls -l /dev/ttyUSB*screen /dev/ttyUSB0 1500000 - power on the orangepi
SPI Flash
Flashing the SPI is for changing the bootloader to support different disks.
The official OrangePi image and u-boot support booting off the NVMe disk.
Bootloader from Official Image
-
Download Ubuntu from the OrangePi site1
- This goes to a shared Google Drive
- You need to be signed in with a Google account to be able to download
- Download
Orangepi5max_1.0.0_ubuntu_jammy_desktop_xfce_linux6.1.43.7z- Date modified: 2024-07-18
- Size: 1.36GB
- SHA256 of the 7z archive:
ba429281271680455e9b73e3548d97f63268a259424f52b4020f407c05a2b015
-
Verify the download
echo "ba429281271680455e9b73e3548d97f63268a259424f52b4020f407c05a2b015 Orangepi5max_1.0.0_ubuntu_jammy_desktop_xfce_linux6.1.43.7z" > CHECKSUMS sha256sum -c CHECKSUMS Orangepi5max_1.0.0_ubuntu_jammy_desktop_xfce_linux6.1.43.7z -
Extract the image
7z e Orangepi5max_1.0.0_ubuntu_jammy_desktop_xfce_linux6.1.43.7z -
Verify the image
sha256sum -c Orangepi5max_1.0.0_ubuntu_jammy_desktop_xfce_linux6.1.43.img.sha -
Flash the image to a class 10 SD card
⚠️ This assumes
/dev/sdais where the SD card is. Update accordingly.output=/dev/sda pv Orangepi5max_1.0.0_ubuntu_jammy_desktop_xfce_linux6.1.43.img | sudo dd iflag=fullblock oflag=direct of="${output}" bs=512b sudo sync -
Insert the SD card into the orangepi and boot up the device
NOTE: Use the HDMI port next to the USB-C power.
-
Once booted, open a terminal and run
# user:pass is orangepi:orangepi sudo nand-sata-install -
Then choose
7 Install/Update the bootloader on SPI Flashand pres<OK>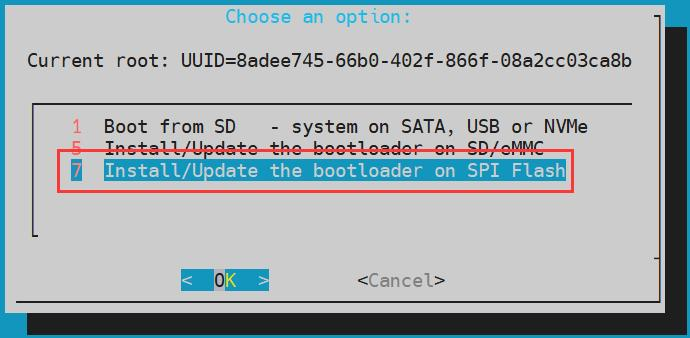
-
Then choose
<Yes>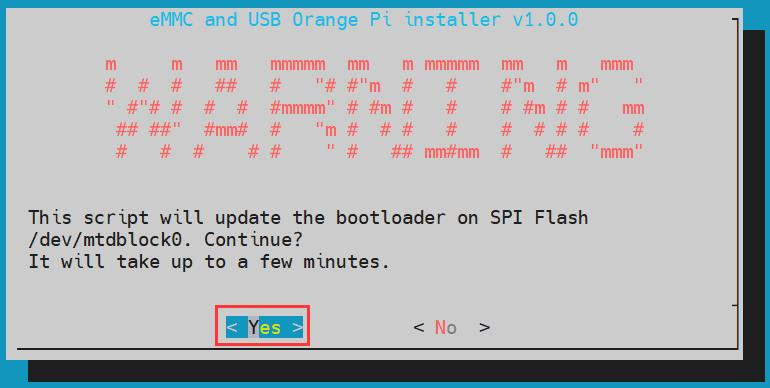
-
Wait for the burning to complete.
Donewill appear in the bottom left corner after the burning is completed.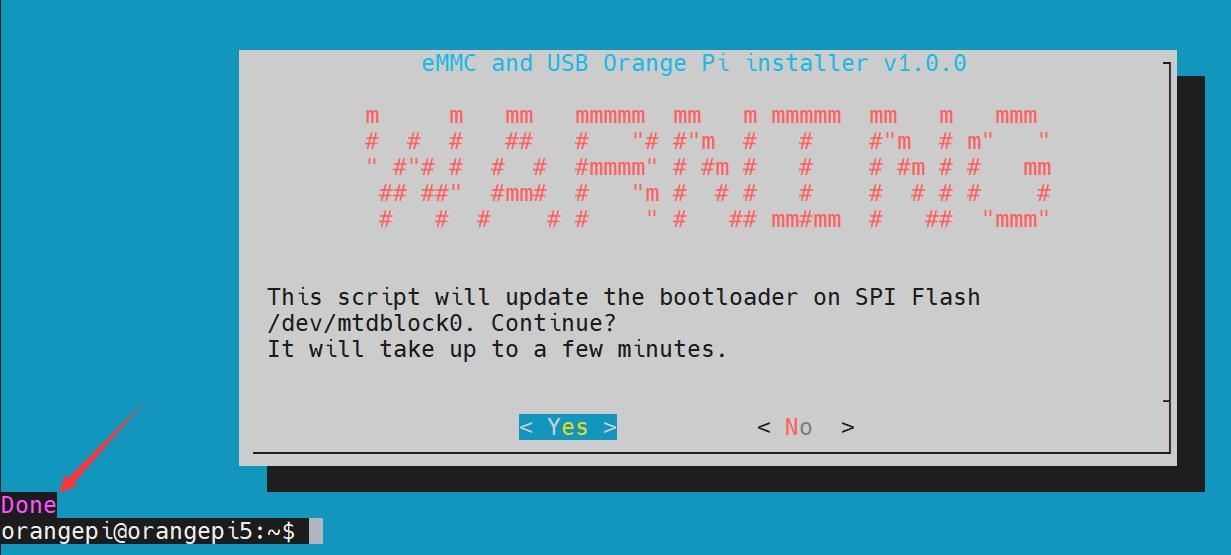
-
Power off the orangepi
-
You will now be able to boot off of the SD card and the NVMe drive. Boot order:
- SD Card
- NVMe
Zeroing the SPI
This is to be done before flashing new bootloaders. There is ~16Mb of storage and this is a slow process. ~5min
pv /dev/zero | sudo dd iflag=fullblock oflag=direct of=/dev/mtdblock0 bs=512b
sudo sync
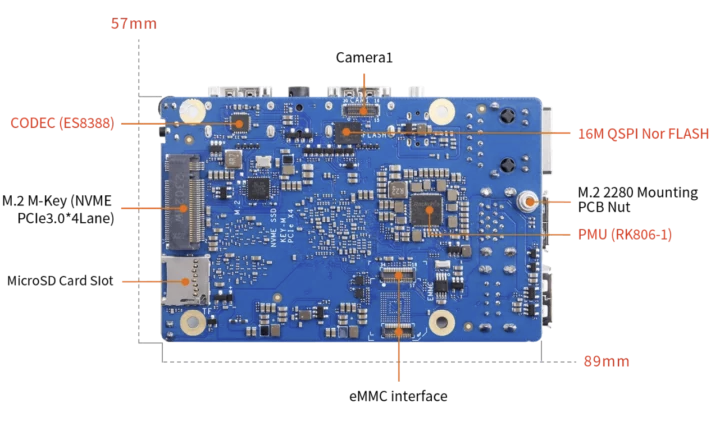
Specs
https://orangepi.net/product/orange-pi-5-max-16gb-ram
| Component | |
|---|---|
| Master Chip | Rockchip RK3588 (8nm LP process) |
| CPU | 8-core 64-bit processor |
| CPU | 4 Cortex-A76 and 4 Cortex-A55 with independent NEON coprocessor |
| CPU | Cortex-A76 at 2.4GHz, Cortex-A55 at 1.8GHz |
| GPU | Integrated ARM Mali-G610 |
| GPU | Built-in 3D GPU |
| GPU | Fully compatible with OpenGL ES1.1/2.0/3.2, OpenCL 2.2 and Vulkan 1.2. |
| NPU | Embedded NPU supports INT4/INT8/INT16/FP16 hybrid computing with up to 6TOPS. |
| PMU | RK806-1 |
| RAM | LPDDR5 496PIN:4GB,8GB,16GB optional |
| Memory | eMMC Flash Sockets(default) |
| Memory | Onboard eMMC(customizable) |
| Memory | Note: Either eMMC socket or on-board eMMC, support: 32GB, 64GB, 128GB, 256GB optional |
| Memory | QSPI Nor FLASH: 16MB |
| Memory | MicroSD card slot |
| Memory | M.2 M-KEY slot: Support NVMe SSD (PCIe 3.0 4Lane) |
| USB | 2xUSB3.0;2xUSB2.0 |
| Video | 2xHDMI 2.1, up to 8k@60FPS |
| Video | 1x MIPI DSI TX 4 Lane |
| Camera | 2x MIPI CSI 4 Lane |
| Camera | 1x MIPI D-PHY RX 4 Lane |
| Audio | CODEC:ES8388 |
| Audio | 1xAudio 3.5mm jack with mic |
| Audio | 1xMIC In |
| Audio | 1xHDMI 2.1 eARC |
| Ethernet | 1xPCIe 2.5G LAN(RTL8125BG) |
| Wi-Fi+BT Module | Onboard Wi-Fi 6E+BT 5.3/BLE module: AP6611 |
| Wi-Fi interface | SDIO3.0 |
| BT interface | UART/PCM |
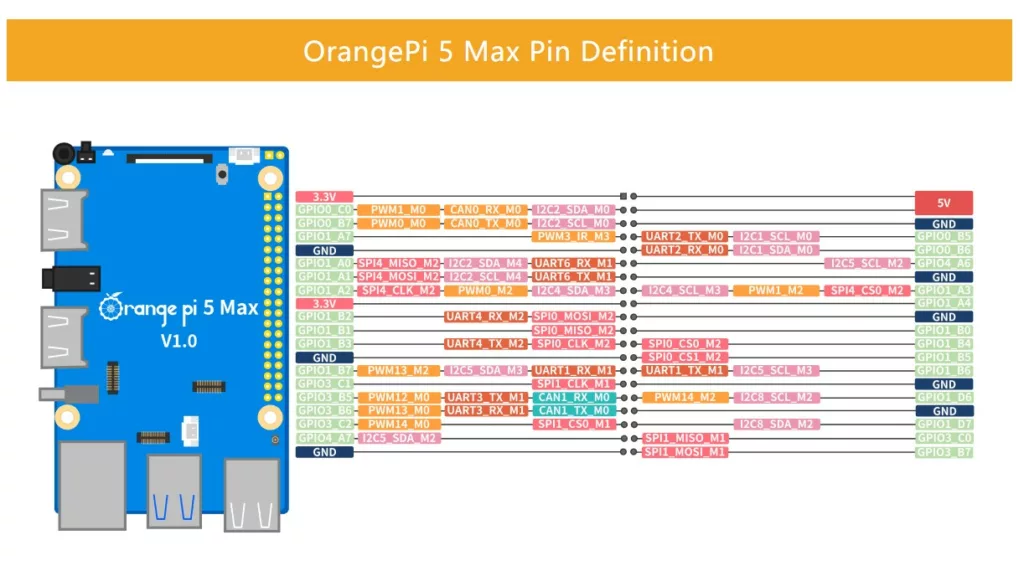
| Expansion Port | Dual-row pin: 2.54mm 40Pin |
| Expansion Port | Supports DC 5V and 3.3V power output |
| Expansion Port | Configurable UART, PWM, I2C, SPI, CAN, GPIO and other functional interfaces. |
| Button | 1x BOOT key, 1x On/Off key |
| Power Source | Supports Type-C power supply, 5V @ 5A |
| LED | RGB LED Side Illumination |
| FAN | 5V 2PIN 1.25mm socket |
| RTC | 3V 2PIN 1.25mm socket |
| Debugging | Debug serial UART included in 40PIN expansion port |
| Supported OS | Orangepi OS(Droid), Orangepi OS(Arch), Orangepi OS(OH), Ubuntu, Debian, Android12 |
References
Primary site1; uses http; not always available
-
http://www.orangepi.org/html/hardWare/computerAndMicrocontrollers/service-and-support/Orange-Pi-5-Max.html ↩ ↩2 ↩3
Source
The content for this site is available at: https://gitlab.com/perobertson-tools/www-perobertson-com/